Table of Contents
- How to access User Management in Portal
- Exploring the User Management page
- How to add a new user in Portal
- How to edit an existing user in Portal
- How to delete an existing user in Portal
- How to manage page access for users in Portal
- Page access options
- Permissions overview
How to access User Management in Portal
The User Management page in portal is your centralized hub for adding new users, editing existing profiles, and managing access levels within your organization.
ℹ️ Note: If you do not see this option, it may be because your user account does not have the necessary permissions to view the page. If you believe this is an error, please reach out to your Strategist for assistance.
-
Find the Profile Icon located in the top right corner of your navigation bar.
-
Click on this icon, then select “Manage Users” from the dropdown menu.

This will take you directly to the User Management Page, where you can add new users, edit existing users, and adjust access levels within your organization.
Exploring the User Management page

-
Invite User: Simply click "Invite User" to add a new member to your organization. Feel free to add as many users as needed—there's no limit!
-
Invited Users: This section displays a list of all users who have been sent an invitation but have not yet activated their account.
-
Invitation Status: Check here to see how long ago an invite was sent. Invites are valid for 24 hours; after that, they will be marked as “Expired.”
-
Resend Invite: If an invite is lost or expires, you can resend it by clicking “Resend Invite”. Make sure the email address is correct before sending.
-
Active Users: This table shows all users who have activated their accounts, including their names, titles, and assigned permissions.
-
Edit: Update a user’s name, job title, function, and permissions here. You can also delete a user account through the Edit modal.
ℹ️ Note: Email addresses are used as unique identifiers and cannot be changed once set.
How to add a new user in Portal

-
Open the User Management page: go to the Profile Menu at the top of the page and select "User Management."
-
Initiate invitation: Click the “Invite User” button to open the invitation form.
-
Complete the invitation form: Fill out the required fields in the form.
-
Email - must be an active email to receive the account invitation
-
Name
-
Job Title & Function
-
-
Click "Invite User" to save and create the new account.
ℹ️ Once the invite has been sent, the invited user will receive an email to activate their account. This invite link is active for 24 hours, and if the invite link expires, click “Resend Invite” to trigger a new notification.
💡 If the user had been previously deleted and needs to be added again for any reason (e.g. role change), please contact your strategist.
How to edit an existing user in Portal
- Navigate to the User Management page by going to the Profile Menu at the top of the page right corner of the page.
-
Locate the user you wish to edit and click the "Edit" button next to their name.
-
In the Edit modal, you can update the user’s Name, Job Title, Function, and Permissions. If necessary, you can also delete the account.
-
Click "Save Changes" to apply the updates.


-
Navigate to the User Management page by going to the Profile Menu at the top of the page right corner of the page.
-
Locate the user you wish to edit and click the "Edit" button next to their name.
-
In the Edit modal, select “Delete User” at the bottom of the page
-
Finalize their deletion by clicking on "Delete Permanently" to remove the user account completely.
ℹ️ Note: The user will not be notified of this action.
💡 If a user is deleted and needs to be added again for any reason, please contact your strategist.
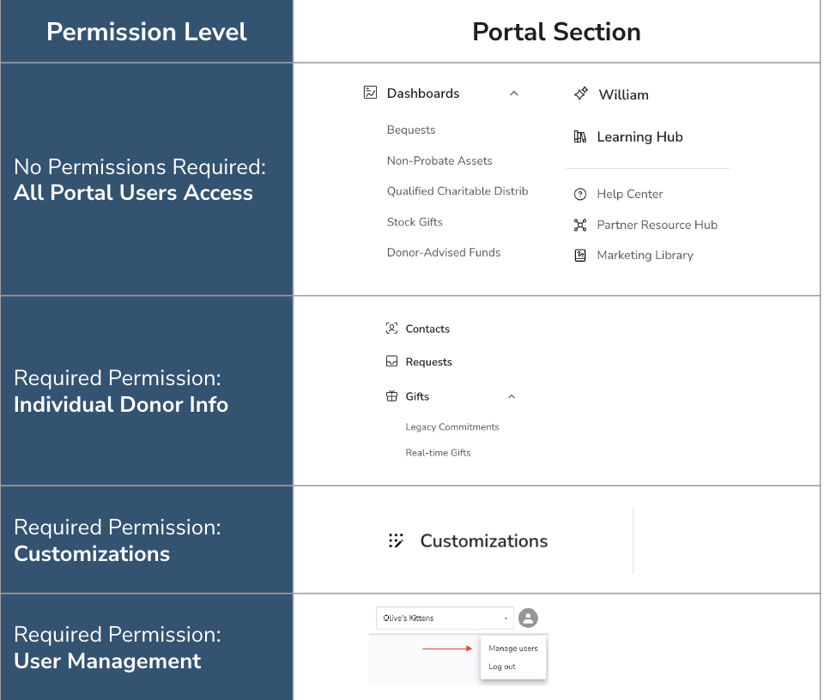
How to manage page access for users in Portal
When setting up new users in Portal, it's important to tailor their access based on their role within your organization. All users who have permission to access User Management can set and edit Page Access permissions for users. Here’s a guide to adjusting user permissions for Page Access:

Page access options
- User Management
-
Default: OFF
-
Users with this permission can access the User Management page. This enables them to invite new users, edit or delete existing users, and modify Page Access permissions for all users.
-
-
Customizations:
-
Default: OFF
-
Users with this permission can access the Customizations page, where they can alter logos, landing page images, and language settings for your organization’s donor-facing landing pages and flows within the Planned Giving Suite and Smart Giving Suite products.
-
-
Individual Donor Information:
-
Default: ON
-
Users with this permission can view detailed donor and gift information on the Contacts, Requests, and Gifts pages. If this permission is revoked, users will still have access to summary data on Dashboards, the William AI-powered Writing Assistant, the Learning Hub, and the Marketing Library.
-
💡 New! You can now add members of your team, such as the Marketing and Communications teams, without revealing sensitive donor data, by hiding "Individual Donor Information" from their permissions.
By managing these permissions, you ensure that each team member has the right level of access to perform their duties effectively while maintaining the security and integrity of sensitive data.
Permissions overview